Tuesday, November 14, 2006

Keyboard Shortcuts

Bypass CD or CD-ROM autoplay [SHIFT] while inserting the disc

Delete an item with no undelete [SHIFT][DEL]

Rename an item [F2]

View an item's Properties [ALT][ENTER]

View an item's Properties [ALT][MOUSE R][MOUSE R]

Paste Special (Microsoft Word) [ALT][e][s][u][ENTER]

When browsing through files, start typing the name of a file or folder to find it.
(Works in explorer, open, and save dialog boxes)

Create a new folder [MOUSE R], [W], [F]

Copy a file [CTRL] drag the file

Arrange icons in alphabetical order [ALT]V, [I], [N]

Arrange icons in alphabetical order [MOUSE R], [I], [N]

Arrange icons by size [ALT][V], [I], [S]

Arrange icons by size [MOUSE R], [I], [S]

Arrange icons by type [ALT][V], [I], [T]

Arrange icons by type [MOUSE R], [I], [T]

Tuesday, November 07, 2006

Convert Fat32 hard drive to NTFS

To convert a volume to NTFS from the command prompt

1.

Open Command Prompt. Click Start, point to All Programs, point to Accessories, and then click Command Prompt.

2.

In the command prompt window, type: convert drive_letter: /fs:ntfs

For example, typing convert D: /fs:ntfs would format drive D: with the ntfs format. You can convert FAT or FAT32 volumes to NTFS with this command.

Important Once you convert a drive or partition to NTFS, you cannot simply convert it back to FAT or FAT32. You will need to reformat the drive or partition which will erase all data, including programs and personal files, on the partition.

Tuesday, August 22, 2006

Software List

List of Great FREE Software

AVI2DVD - Burn a DVD to play in your DVD player from an AVI movie file on your hard drive.

CD Burner XP - Burn music CDs, computer files, and more with this free CD burning application

CutePDF Writer - create PDFs from Microsoft Word, Exel, Powerpoint, and any program that can print. Create PDFs for free!

Daemon Tools - creates a virutal CD/DVD Drive so that you can load Game files/discs that are disc images or ISO files, it also lets you watch DVD ISO files on your hard drive. Definitely a Gamer's Choice program! (You don't have to have the disc in your drive, or hear it spinning!)

DVD Decrypter - Remove most DVD copy protections, and copy DVD movie files to your hard drive, or create an ISO file to burn/ watch on your computer without the DVD disc.

DVDFab Decrypter - rips DVD video files to a hard drive and removes all the newest copy protections

DVD Shrink - this DVD burning program will shrink DVD video files, discs, or ISO files to fit on a 4.7GB disc. It's compression technology creates/burns files that will fit on a standard 4.7GB disc and still look great like the original. It also allows you to remove DVD video clips/extras that you don't need/want.

Irfanview - view images quickly, resize images, automatically resize, rotate, or rename many images.

MPlayer - simple, easy to use video player that includes many popular video codecs pre-installed. Simply drag your video file to the shortcut and watch it. Mplayer is great for watching stubborn video files or files that won't open with Quicktime or Windows Media player.

Printfolders (alt. Download link)- print a list of files/folders (saves to a text file)

Quintessential Player
- clean, fast, and free music/video player, and CD Ripper

Source Edit - edit HTML, PHP, and other source code, and FTP server uploads can be set to run every time you save the file.

Videora iPod Converter - converts DVD video files to the iPod video format (requires DVD Decrypter)

WASTE
- create a private P2P network on your College Campus to share music, movies, and software, users can only see the network when connected by a friend already on WASTE.

Wink
- record flash video demos of computer tasks (can record audio)

Yamipod - copy files from your iPod to your friend's computer, or copy files from his iPod to yours. Yamipod allows you to manage the files on your iPod without using iTunes!

ZipFree 2000 - create ZIP files for FREE! Uses a right click send-to menu in explorer

Monday, August 21, 2006

Prevent Reboots

(Found article on pcmag.com on 10-24-06)

Prevent Reboots

Many people leave their PCs on all of the time. That often means dozens of open windows, and information that hasn't been saved as recently as possible. There's nothing worse than going back to your PC and seeing a message that says "Windows recently downloaded and installed an important security update to help protect your computer. This update required an automatic restart." Or, while you are working, you may grow tired of the nagging little pop-up window with a countdown that tries to reboot your computer in 15 seconds. A simple edit to the system Registry will end this annoyance and save you from losing potentially hours of work if a reboot occurs when you aren't there to prevent it.

In fact, the U.K. publication The Register recently reported that a computer consultant in the U.K. has invoiced Bill Gates for £1,200 for "sabotaging" his work, left open during a critical system update reboot. Even if you tell Windows Update that you wish to perform a custom manual installation of new software, updates can still be pushed down to your system. Most of these critical updates are system-level files that require a reboot to fix problems properly, but you can still make Windows work the way you want it to.

Click Start, then Run. Then type regedit and press Enter. Be careful in the Registry, following the directions slowly and reading twice before clicking once. With the Registry Editor opened, click and expand HKEY_LOCAL_MACHINE\SOFTWARE\Policies and finally Microsoft\Windows. Right-click on Windows and select New\Key with your left mouse. Type WindowsUpdate and press Enter. This will create a new folder.

Now right-click on that folder and create another new key, this one named AU, and press Enter. AU stands for Auto Update. Turn to the right-hand pane, where an entry reads (Default); right-click on the white space and select New DWORD Value. Enter the string NoAutoRebootWithLoggedOnUsers, and press Enter. Now double-click that entry and change the Value Data to a 1, with the Base button of Hexadecimal selected.

Click on File | Exit, after which the Registry autosaves (just as other applications ought to but don't), and reboot. Once Windows loads this value it should never force a reboot when you are not present. It's a small price to pay for regaining control of your computer.

Friday, August 11, 2006

Copy Playstation 2 disc screenshot

Screenshot from Alcohol 120% for copying a Playstation 2 disc to the hard drive.

Friday, July 07, 2006

Full DVD Burning Guide

If you're new to DVD Burning this guide with screenshots should help get you on the right track.

If you're burning a movie that was released by Sony, including any of the following, You need to look at the Burning Sony and new DVDs guide.

- Batman Begins
- Fun with Dick and Jane
- Howl's Moving Castle
- Legend of Zorro
- Madagascar
- Memoirs of Geisha
- Transporter 2
- Underworld 2 - Evolution
- Walk the Line

For other movies, read below:

Commercial programs and technology companies have to abide by copyright laws, so that's why you can't burn DVDs with Windows Media Player.

Copying Movies can be a slightly complicated process if you're not familiar with the programs used to do it. However, once you're accustomed to using the software, it's much easier.

So here's how to get started:

Burning DVDs with DVD Decrypter, DVD Shrink, and Nero.

Before you start, you’ll need to have the following programs installed on your computer:

DVD Decrypter
http://www.mrbass.org/dvdrip/

DVD Shrink
http://www.mrbass.org/dvdshrink/

Nero (version 6.3 or higher recommended, which you can download from oldversion.com)
http://www.oldversion.com/program.php?n=nero

serial number for Nero 6.3
http://computer-tricks.blogspot.com/2006/05/nero-63.html


(Note: DVD Decrypter and DVD Shrink are free online.)

(Note: Always try to use a new, unscratched DVD movie disc whenever making copies, as discs in poor condition may not copy, or will likely pass on glitches to the copy.)

It’s also recommended that you don’t run other programs while burning DVDs unless you have over 1GB of RAM or more.

Insert the disc you wish to copy.

Close any DVD player program that opens.

Phase 1

Open DVD Decrypter.

Click on Mode > ISO > Read


Now click on the folder icon that shows where the DVD file will be saved. Choose a folder.

Now click on File > Decrypt.

The process of making an exact copy of the disc to the hard drive should take approx. 30-40min. depending on the length of the movie and extra features.

When DVD Decrypter is finished creating the file, you can close the program and eject the disc.

Phase 2

Now open DVD Shrink.

Click on File > Open Disc Image


Browse for the file that you saved when copying with DVD Decrypter.

DVD Shrink will now analyze the movie for a minute or two.

Uncheck boxes for extra audio Languages that you don't need on the DVD

Click on the plus + sign by the Extras folder.
(This is where the bonus materials are on the disc)

To have higher movie quality, remove the extras by clicking on the individual files and selecting Still image/still images from the dropdown menu. (You can preview the extras if you want to see the clips before removing them.)


If you'd like to keep the extra features on the DVD, select the clip and change the dropdown menu to custom compression and lower it to about 50 or 60 percent for each extra.

Click on the main movie folder. If you've removed enough extras, or compressed them, the movie quality should be around 60-70%, the HIGHER THE BETTER.

Note: Target quality is about 65-70%, anything higher than 65%, and on regular size
TV's you won't be able to tell the difference between the copy and the original.

I personally either remove the extras or compress them to achieve the best quality.

If a movie is not too much over two hours, or doesn't have many extras, it will copy
closer to 100% quality.

Insert a blank DVD disc.


When you’ve achieved the quality setting on the main movie that you’d like, click on the Backup! icon.

Before clicking OK to start the burning, click on the Burn Settings tab and change the speed to 1 or 2 speeds lower than the highest available.


DVD Shrink will now compress the file that DVD Decrypter made and create DVD video files. Afterwards, it will automatically burn those files and the disc will be completed.

This will take about 20-30 min. to create the DVD video files and approx. 10-15 min. to burn onto the blank disc.

Thursday, July 06, 2006

Burning new DVDs

NOTICE: THIS GUIDE IS TO HELP YOU BACKUP MOVIES THAT ARE GENERALLY HARD TO COPY. YOU SHOULD ONLY COPY MOVIES THAT YOU ALREADY OWN; IT IS ILLEGAL TO COPY ANYTHING ELSE.

If you've had problems copying movies in good condition with DVD Shrink, this guide should help you work around any problems. DVD Decrypter is also no longer updated, so it cannot break copy protections on movies released since about Dec. 2005 / Jan. 2006, including a few other movies that have been re-released to include new content.

You'll want to use DVDFab Decrypter, because it is updated so it can break new copy protections, such as Sony's new Arccos.

This guide will help you “backup” the following DVD movies:

- The Aviator
- Batman Begins
- Fun with Dick and Jane
- Howl's Moving Castle
- Legend of Zorro
- Madagascar
- Memoirs of Geisha
- Transporter 2
- Underworld 2 - Evolution
- Walk the Line

You can find a full list of the movies that need to be copied with DVDFab Decrypter at the Wikipedia article below:

ARccOS Protection - Wikipedia Article

Note: If the movie fails to complete in DVDFab Decrypter, and the disc has little or no scratches, the movie most likely has a new copy protection scheme.

You can download DVD Fab Decrypter here:

http://www.dvdidle.com/free.htm

After downloading the program, also download a copy of DVD Shrink, so that you can fit the movie on a standard 4.7GB blank DVD disc.

DVD Shrink download and Guide here:

http://www.mrbass.org/dvdshrink/

And finally, you'll also need Nero (version 6.3 or higher recommended, which you can download from oldversion.com)

http://www.oldversion.com/program.php?n=nero

serial number for Nero 6.3

http://computer-tricks.blogspot.com/2006/05/nero-63.html

Install all three programs before beginning.

Insert the DVD movie that you’d like to copy, and press down the shift key for about 30 seconds immediately after you insert the DVD into the drive. This helps prevent some copy protection schemes from loading automatically.

If you were pressing down the shift key long enough, no DVD playing program should appear. Otherwise, close any DVD player that open.

Open DVDFab Decrypter.

Click on the button to the right of the “Target” that shows a folder.

Select a folder to save the DVD files, and create a new folder.

If DVDFab warns about deleting files, don’t worry as long as you either created a new folder, or if the selected folder is empty.


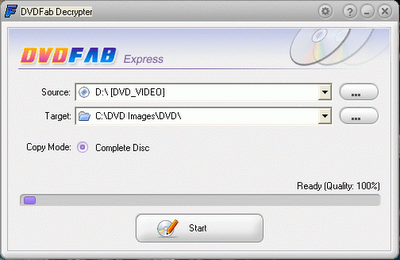
Now click on the Start button.

DVDFab will now copy all of the DVD files to your computer and this will take approx. 20-40 min. depending on the length of the disc and the maximum reading speed on your DVD Burner.

When DVDFab has finished successfully, you’ll get a confirmation message.

Close DVDFab.

Open DVD Shrink.

In DVD Shrink, click on File > Open


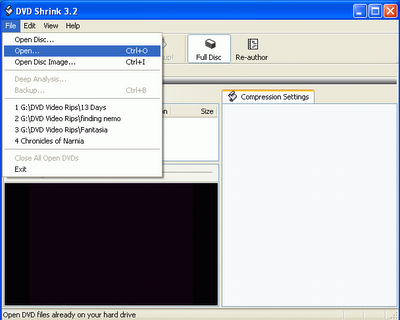
(Locate the files that you saved with DVDFab Decrypter).

DVD Shrink will now analyze the movie for a minute or two.

Uncheck boxes for extra audio Languages that you don't need on the DVD

Click on the plus + sign by the Extras folder.

(This is where the bonus materials are on the disc)

To have higher movie quality, remove the extras by clicking on the individual files and selecting Still image/still images from the dropdown menu. (You can preview the extras if you want to see the clips before removing them.)

If you'd like to keep the extra features on the DVD, select the clip and change the dropdown menu to custom compression and lower it to about 50 or 60 percent for each extra.

Click on the main movie folder. If you've removed enough extras, or compressed them, the movie quality should be around 60-70%, the HIGHER THE BETTER.

Note: Target quality is about 65-70%, anything higher than 65%, and on regular size

TV's you won't be able to tell the difference between the copy and the original.

I personally either remove the extras or compress them to achieve the best quality.

If a movie is not too much over two hours, or doesn't have many extras, it will copy

closer to 100% quality.

When you’ve achieved the quality setting on the main movie that you’d like, click on the Backup! icon.

Insert a blank DVD disc.

Before clicking OK to start the burning, click on the Burn Settings tab and change the speed to 1 or 2 speeds lower than the highest available.


DVD Shrink will now compress the files that DVDFab Decrypter created. Nero will finish burning the DVD Automatically.

This will take about 20-30 min. to create the DVD video files and approx. 10-15 min. to burn onto the blank disc.

Sunday, June 25, 2006

Alien Skin Exposure Software

PHBHEJNALOMH

This serial s/n was pretty hard to find, because there were several links to follow on those serial sites.
I thought I was going to end up in a loop of dead links.

I confirmed that it should work by entering it into a google search.

Submitted to serialz.to on 6/25/06 at 1:45am. Gave them the crap_emails address.

Saturday, June 24, 2006

The Sims 2 - Open for Business

1DQQ-GNME-FIGH-TING-4FUNSDSJ-NKFG-WPEM-N7GC-44RJGKDM-
FYLL-Y57Y-WBT5-2C2L

OR

XVSA-24UG-G34W-NG32-YRLD

OR

9UWE-LLX8-VZKG-PFST-2SR5

Warcraft 3 III

RWOIGJ-MYAK-ENT7B6-JXRQ-24G70N

(it won't work on BattleNet.St3R30)

OR

NO5T79-FQYI-84ECPR-XVH6-7GWDBN

OR

FCHFXL-JPLA-TTMWZJ-RN19-D3UOBY

Dawn of War - Winter Assault

458B-F302-1B93-D140-8C1F

The Sims original and living large

The Sims (original)

101121-202080-217218-4564

OR

100866-456455-547801-5458

OR

100270-325684-522575-8212


The Sims Living Large


1501-8620638-9299163-2529

OR

1501-3787712-1919378-7449

OR

1501-8620638-9299163-2529

3D Studio Max 7

040-11111111

OR

7205 1809 5391 3524 2452

Starcraft

4835-08309-0407

OR

2951-83214-3418

Vegas Video 6.0

Name: 1BENWWF
S/N: JB-46NQR9-R7Q9W3-9DMZ80

Monday, June 19, 2006

Command and Conquer Yuri's Revenge

050821-978742-248929-4557

OR

043930-288237-966022-4511

OR

042830-841635-898083-4674

Freehand 11

FHW110-57381-91665-81669

OR

WSW600-58472-80660-08253

OR

FHW110-53573-58422-28900

Monday, June 12, 2006

DVD Burning Guide

If you're new to DVD Burning this guide should help get you started!

If you'd like to see this guide with photos/screenshots, see the Full Guide Here.

If you're burning a movie that was released by Sony, including any of the following, You need to look at the Burning Sony and new DVDs guide.

- Batman Begins
- Fun with Dick and Jane
- Howl's Moving Castle
- Legend of Zorro
- Madagascar
- Memoirs of Geisha
- Transporter 2
- Underworld 2 - Evolution
- Walk the Line

For other movies, read below:

Commercial programs and technology companies have to abide by copyright laws, so that's why you can't burn DVDs with Windows Media Player.

DVD Shrink is no longer updated, so it cannot remove new copy protections from the last approx. 6 months. Unfortunately, you can waste blank discs using only DVD Shrink. To burn newer DVDs, reference the following guide:

Copying Movies can be a slightly complicated process if you're not familiar with the programs used to do it. However, once you're accustomed to using the software, it's much easier.

So here's how to get started:

Burning DVDs with DVD Decrypter, DVD Shrink, and Nero.

Before you start, you’ll need to have the following programs installed on your computer:

DVD Decrypter
http://www.mrbass.org/dvdrip/

DVD Shrink
http://www.mrbass.org/dvdshrink/

Nero (version 6.3 or higher recommended, which you can download from oldversion.com)
http://www.oldversion.com/program.php?n=nero

serial number for Nero 6.3
http://computer-tricks.blogspot.com/2006/05/nero-63.html


(Note: DVD Decrypter and DVD Shrink are free online.)

(Note: Always try to use a new, unscratched DVD movie disc whenever making copies, as discs in poor condition may not copy, or will likely pass on glitches to the copy.)

It’s also recommended that you don’t run other programs while burning DVDs unless you have over 1GB of RAM or more.

Insert the disc you wish to copy.

Close any DVD player program that opens.

Phase 1

Open DVD Decrypter.

Click on Mode > ISO > Read

Now click on the folder icon that shows where the DVD file will be saved. Choose a folder.

Now click on File > Decrypt.

The process of making an exact copy of the disc to the hard drive should take approx. 30-40min. depending on the length of the movie and extra features.

When DVD Decrypter is finished creating the file, you can close the program and eject the disc.

Phase 2

Now open DVD Shrink.

Click on File > Open Disc Image

Browse for the file that you saved when copying with DVD Decrypter.

DVD Shrink will now analyze the movie for a minute or two.

Uncheck boxes for extra audio Languages that you don't need on the DVD

Click on the plus + sign by the Extras folder.
(This is where the bonus materials are on the disc)

To have higher movie quality, remove the extras by clicking on the individual files and selecting Still image/still images from the dropdown menu. (You can preview the extras if you want to see the clips before removing them.)

If you'd like to keep the extra features on the DVD, select the clip and change the dropdown menu to custom compression and lower it to about 50 or 60 percent for each extra.

Click on the main movie folder. If you've removed enough extras, or compressed them, the movie quality should be around 60-70%, the HIGHER THE BETTER.

Note: Target quality is about 65-70%, anything higher than 65%, and on regular size
TV's you won't be able to tell the difference between the copy and the original.

I personally either remove the extras or compress them to achieve the best quality.

If a movie is not too much over two hours, or doesn't have many extras, it will copy
closer to 100% quality.

Insert a blank DVD disc.


When you’ve achieved the quality setting on the main movie that you’d like, click on the Backup! icon.


Before clicking OK to start the burning, click on the Burn Settings tab and change the speed to 1 or 2 speeds lower than the highest available.

DVD Shrink will now compress the file that DVD Decrypter made and create DVD video files. Afterwards, it will automatically burn those files and the disc will be completed.

This will take about 20-30 min. to create the DVD video files and approx. 10-15 min. to burn onto the blank disc.

Sunday, June 11, 2006

Save a DVD to your Computer

If you have a large hard drive, or an external hard drive, you can make a full copy of the DVD to your hard drive using DVD Decrypter.

Note: The file will be between 6GB-8.5GB depending on how long the movie is and how many extra features are on the disc.

You can download DVD decrypter from the link below.

DVD Decrypter Download Page
Daemon Tools Download Page


You'll also need to install Daemon Tools, which I've also included a link for.

After installing DVD decrypter, insert the DVD and close any DVD player programs that appear.

Open DVD Decrypter and select Mode > ISO > Read


Now, click on the little folder icon where it shows the save location and choose a folder to save the DVD File.

Now click File > Decrypt.

This process will take approx. 20-40min. depending on the speed of your DVD Drive, and luckily you can do this with a mere DVD-ROM drive.

Note: Make sure you use a disc that is not scratched and is in the best possible condition.

When it's finished and has completed successfully, close DVD Decrypter.

You can eject the DVD movie.

Make sure you've installed Daemon Tools.

Open Daemon Tools.

Now look in bottom right corner of your screen (system tray) for an icon with a lightning bolt.

Right click on that icon and go to Virtual CD/DVD Drives > Mount Image and navigate to the folder with the DVD file that you just created.


If DVDs automatically load when you insert them into your computer, the DVD should start playing!!

Saturday, June 03, 2006

Internet explorer save dialog


If you don't know where your files are being save in Internet Explorer, click to save a file, and you should see this box appear. Click on the down area to see where your files are being saved.

Wednesday, May 31, 2006

Nero 7

5C800010800000000056668786915C80001080000000008666123019


OR

5C82-0010-8011-0000-7932-4090-9107

OR

5C800010800000000086661230195C800010800000000006664341975
C80001080000000002666685258

Don't ever register the software if you use serial numbers from the internet!!

Diablo 2

4XB6-87J4-E4M9-K4CJ

OR

Z6PH-N7ZG-JFGM-P4P8

OR

ZPZ9-6W7X-DJPJ-ZN7W

Need for Speed Most Wanted

PL33-NKML-S49X-DR7W-6MY9

OR

A6RR - 55C9 - P4TN - SPZH - 9XLR

Monday, May 29, 2006

Warcraft 3 III Reign of Chaos

4PGJ6F-H26K-KZJ26C-GXPH-RMC8CY

FIFA 2006

4788-7MA4-C2MF-GXEF-QDXQ

Warcraft 3 III Frozen Throne

C9JC7R-XNYY-BNFNWD-DWNJ-PCX7XJ

OR

VNM6K8-D24F-DV7JJJ-2DVM-9X9D9MJN9YDG-WY7Z-XGEK4C
-N6WB-CEGDG9HH84GY-2CPR-EYB8MM-6VYV-C2P8P8YF74K9-
HZ2N-ZXK6CN-JCRV-9E6467T4CH2G-E6BF-Y7WZ7Z-6BPK-
PRM2MCP72CW4-6GDM-CXNPN6-M7FB-284J42B49MEB-NCJR-
M8FPPE-EBYY-EFM9M9VC8H9X-2NHZ-PGV62K-FD8J-P46Z68

Age of Mythology

P3HM4-WDM27-662XW-9BPTV-CFVMQ

OR

QVW83-4MC67-FDPTH-49PT8-6HGRD

Command and Conquer Red Alert 2

026934-529398-805865-3147

Photoshop Elements 4

1057-1216-0461-4400-0979-1595

or

1057-1213-2730-1611-6360-6332

Don't register the software when using this serial number!!

Tony Hawk Pro Skater 4

P4EPBTIQDAIH7WXM

Don't register the game if you use this serial number.

Photoshop 4

WW250R3107069-312

Don't register if you use this serial number!

Enter any name, preferably a joke name, and not your real name.

Dreamweaver 8

WPD800-58436-27232-80204

If you use this serial number, don' register the software.

Nero 6.3

Nero Edition 6.3
1A23-0009-5030-2246-6907-8435

You can download Nero version 6.3 from OldVersion.com's Nero Page

(Don't register the software if you use this serial number.)

Tuesday, May 23, 2006

Link in New Window

Shift-click on a link in Internet Explorer to open it in a new window.

Saturday, May 20, 2006

Acid Pro 6

Here's the serial number for Acid Pro 6.

7TVFNQXTNDPECF3MPPDX

Remember, don't register the program if you use this, or other serials numbers that you've found on the web.

Monday, May 15, 2006

Office 2003

2003 Professional:
GWH28-DGCMP-P6RC4-6J4MT-3HFDY

ky7h8-cw4qb-w4392-4xjq9-xxhjm

KWHMK-Q639R-D4H3T-4BPH4-RWX3B

(three different serial numbers are listed above.)

Remember: don't register the software, if you use any of these serial numbers / CD keys!!!

Sunday, May 14, 2006

Microsoft Word 2002 / Office 2002

Use this serial number. . .and remember NEVER register if you've found a serial number on the internet.

FM9FY-TMF7Q-KCKCT-V9T29-TBBBG

Saturday, May 13, 2006

Ipod Rip

iPodRip is a program to copy songs from an iPod onto another computer.

iPod Rip Download Page (trial version)
ipod Rip on Download.com (trial)

Mac Right Click

Control-Click for mac is the same as right-clicking on a PC.

Tuesday, May 09, 2006

Excel - Show Time in Decimal Format

To have excel show time in decimal format, multiply by 24 and show in General Format.

To test this, put 1:30 in a cell and when you finish it should be 1.5

Saturday, May 06, 2006

Show Full Menus in Microsoft Office

PC World October 2004 - Annoyances Issue

In Word, Excel, and other office programs--to show the full menus and turn off the feature that shows "personalized menus", do the following

Tools > Customize > Options > Always show full menus (check box)

Friday, April 21, 2006

Installing Printers and Printer Drivers

(The drivers for the printer were already copied to a folder on the Hard Drive of the PC.)

- Hook up the printer to the computer.
- When the add printer wizard comes up, let it go through the screens until it gets to a dialog asking where to look for the drivers. Check to browse on the Hard Drive and navigate to the folder where the drivers were copied.
- Go through the next screens.
- If the printer drivers installed successfully, there will be a balloon window saying so.
- It should also prompt you to print a test page.
- Print the test page, and then you know that you're good to go.

Sunday, February 19, 2006

Site - date updated

Know when the webpage you are visiting was last updated
type in the address field: javascript:alert(document.lastModified)
Time and date will appear in a pop-up window.

iexpress tool

A sweet feature in windows is the ability to create a self-extracting package with the iexpress program.

iexpress creates an executable (.exe) file that allows the person to extract the contained files without having Winzip or other unzipping software.

- Great for transfering several files and bundling them into one
- The user is able to select where to extract the files
- can include a license or description of what is in the package

To start the iexpress program go to:
Start > Run > iexpress

Friday, February 17, 2006

Guide to WASTE

This summary is not available. Please click here to view the post.

Thursday, February 02, 2006

TV Display for IBM Laptop

Right click on the desktop

Graphics Options > Output > Intel Dual Display Clone > Television + Notebook


This is how to display the laptop on a TV through an S-Video cable.

Friday, January 27, 2006

Fixing Firefox Profile Problem

Fixing Firefox Profile Problem

Help: Firefox Lost My Profile

When I tried to open Firefox yesterday, I was greeted with a dialog box requesting that I choose a profile. When I tried to select the one and only default profile, Firefox wouldn't or couldn't open it. I created a second profile and Firefox opened, but of course without all of the customization I had done to it. Not wanting to reinvent my personal Firefox, I decided to poke around in the Profile directory and I came up with a simple way to restore my old profile, which I will share with you now.

Follow these steps to restore your profile:

  1. When you encounter the dialog box requesting a profile, create your second profile and give it any name. Click OK and a plain vanilla version of Firefox opens.
  2. Make sure you close Firefox and Thunderbird.
  3. Navigate to your Firefox profiles folder. This is buried in your profile folder in Windows XP. My path looks as follows:
    C:\Documents and Settings\UserName\Application Data\Mozilla\Firefox\Profiles
  4. You should see two profile folders. Right-click each one and select Properties and determine which one was created today (the plain vanilla version) and which is your old, trusty profile. The profile you want should have an older Created date.
  5. Double-click the older folder to open it. This is important. Make sure it's the older folder.
  6. Press Ctrl-A to select all of the content in your old folder and Ctrl-C to copy all of it.
  7. Navigate to the new profile. When the folder is open, press Ctrl-V to paste the contents of your old profile into your new one.
  8. Note that if Firefox or Thunderbird is open, you will get an error message before all the files are copied. Close both programs. If you continue to get an error message claiming one is still open, press Ctrl-Alt-Del to access the Windows Task Manager. Click the Processes tab. Click the Image Name column to sort alphabetically by name, then scroll down and see if Firefox or or Thunderbird are in the list. If either one is, select it and click End Process. You should now be able to paste the entire contents of your old folder into your new profile.
  9. When you are done, open Firefox and your old settings should be restored.

Wednesday, January 25, 2006

Setting up Private Network (Waste)

How to setup WASTE

First download the setup file here:
WASTE setup Download

Run the setup program that you downloaded.

For the first few steps, click next until you get to the following step.


Put in a nickname or screename and put the real name just whatever you'd like.

Select T3/LAN for the connection speed.

Leave the Network name/ID blank.

Click next.

On the following step, click on "Run key generator"

You'll also make a password, which you can save later, but use a password you won't forget.


After you've generated your key click on "Copy my public key to the clipboard". Now open up notepad (Start > All Programs > Accessories) or another text editor and paste your key. Save the text file and email/IM it to the person that is connecting you to the network.

The person connecting you to WASTE needs to add your key that you just sent them. That can be done by opening the main WASTE window and going to File > Preferences > Public Keys
1) Click on the add button and import the text file containing the key.
(See image below)


Now click on "Import public keys" and import the text file that either myself or a friend has given you to connect to the network.

For the person already on WASTE to give you their key, they should:

1) Open the main WASTE Window and go to File > Preferences > Private Key
2) Click on copy my public key to the clipboard.
3) either save the key in notepad (Start > Accessories > Notepad) or they can email you the text of the key (it's better NOT to instant message the key because it can get cut off.)
(See image below)


Now the new person connecting to WASTE can either paste in the key or import the text file containing the key.

After you've received the confirmation that the key was imported, click next.

Now to choose the folder for your downloads.

I recommend using the My Music folder on your PC, unless you'd like a different folder for your music/movie/software downloads to go into.


It's up to you whether or not you share your music and other stuff, but if you've got something really rare, or an eclectic collection of music it would be sweet to share. Again, it's up to you.

Now click run.

Ok, we're almost done!!!

In the little window that comes up, click on the icon with the arrow pointing to it.


When the following window comes up, change the Maintain "0" connections box to the number 4. Then, type in the IP address of the person connecting you to the network. (If you need to know how to get the IP address read below.)

Once you have the person's IP address type, or paste it, and hit enter.


How to find the person's IP address who is already on WASTE.

1) In the little WASTE window with all of the user names, click on File > Preferences. Then click on Your IP Addr. on the left hand menu. (See the image below.)


Within a few seconds a window should pop-up asking you if you would like to accept a key from a user's name.

Click yes, and keep clicking yes (or use the y key on your keyboard) until it doesn't ask you anymore. You'll probably have to accept about 40-60 keys. Every time you click yes, this is connecting you to a new person.

After that's done, in the same window change the number of connections to 10.

You can close this window now.

Now you should be setup on the network, and there shouldn't be anymore setup required each time you want to connect.


There are two settings you should adjust before using WASTE.

Click on File > Preferences.

Click on "Receving" and make sure the box is checked to "Prompt before accepting"


Now click on "Pending Keys" and check the box for "Auto-accept broadcasted public keys"


This will prevent the key prompts from coming up while you are doing other work. On several occassions, I was playing a multiplayer first person shooter and the key box pop-up in front of my screen, pausing the game. It will also prevent you from being annoyed by having to accept new ones while you're working on other stuff.

NOW YOU'RE READY TO EXPERIENCE THE GLORY OF WASTE.

To search for files, click on the magnifying glass icon in the main window.

Tuesday, January 24, 2006

Minitab 13 s/n serial

Minitab keys, serials

MiniTab 13.0
WIN1310.00689

Minitab 10.0 statistical software
WC1020775

Minitab 9.2
W92006400

Friday, January 20, 2006

OurTunes

Connect and download music from all the shared iTunes music on Campus!!

Tuesday, January 17, 2006

Photoshop CS & CS2 Features

Photoshop CS

Top Features for Photographers:

  • Professional toolset: create original images or modify photos using a full assortment of painting, drawing, and retouching tools.
  • Color correction: improve the color, contrast, and dynamic range of any image with a comprehensive set of professional color-correction tools.
  • Improved File Browser: quickly preview, tag, and sort images; search and edit metadata and keywords; and automatically share batches of files from the improved File Browser.
  • Comprehensive 16-bit support: perform more precise editing and retouching with expanded support for 16-bit images in core features, including layers, brushes, text, shapes, and more.
  • Healing Brush: effortlessly remove dust, scratches, blemishes, wrinkles, and other flaws with the Healing Brush.
  • Integrated digital camera raw file support: get truer, higher-quality output by working with the complete raw data files from most major digital camera models.
  • Match Color command: achieve a consistent look between package shots, fashion photos, and more by instantly matching the color scheme of one image to another.
  • Histogram palette: monitor changes to your image in the Histogram palette, which dynamically updates as you make adjustments.
  • Shadow/Highlight correction: quickly improve the contrast of over- or under-exposed areas of an image while preserving the overall balance of the photo.
  • Crop and Straighten command: Scan multiple images at once and let Photoshop automatically straighten and save each image as an individual file.

Top Features for Web Designers:

  • Enhanced ImageReady user interface: create and modify Web designs faster with multiple object selection, object grouping, and smart guides.
  • Improved Photoshop integration: enjoy quicker, more seamless integration between Photoshop and ImageReady, plus automated file saving and common commands, tools, and shortcuts.
  • Image slicing: slice complex, layered images and apply appropriate format and compression settings to each area before exporting as an HTML table.
  • Variable data support: easily import database and spreadsheet information to automate the production of Web graphics.
  • Macromedia Flash (SWF) file export: use ImageReady CS to create Macromedia Flash (SWF) animations, complete with vector artwork and variable text.
  • Animated GIF creation: turn layered Photoshop or Illustrator files into compact GIF animations in a few short steps.
  • Web Content palette: create and edit rollovers and other interactive Web elements more easily using the new Web Content palette.
  • Layers-as-files export: optimize and export individual layers as separate files for use in Macromedia Flash (SWF) animations and dynamic HTML.
  • Weighted optimization: smoothly vary compression settings using channels to display higher-quality results in critical image areas.
  • Streamlined HTML output: create leaner, more easily edited HTML with new controls for nested tables, XHTML, and more.

Photoshop CS2

Smooth File Handling with Adobe Bridge
Simplify file handling with Adobe Bridge, the next-generation file browser. Students can process multiple camera raw images at once; resize, rate, and label thumbnails; quickly review images in Slideshow mode; search metadata; and more.

Vanishing Point
This revolutionary technology lets you produce amazing results in a faction of the time. You can confidently clone, brush, and paste elements that automatically match the perspective of any image area.

Image Warp
Students can easily create packaging mock-ups or other dimensional effects by wrapping an image around any shape or stretching, curling, and bending an image using the Image Warp tool. Faculty
and students will embrace this new feature, which lets them add dimensionality to their creations without using complex 3D software.

Advanced Noise Reduction
Give your work a professional look by polishing digital photos and removing JPEG artifacts with advanced noise reduction. Now you can produce images that look great for advertisements, brochures, posters, magazines, newspapers, Web sites, presentations, and much more.

Multiple Layer Control
Select and move, group, align, transform, and warp objects more intuitively by clicking and dragging directly on the canvas. Now it's easier for students to work with complex, layered images.

Sunday, January 15, 2006

Tile Selected Windows

To tile just a subset of your open programs (at least in Windows XP), click on the taskbar button for the first program you want to tile, then Ctrl-click on the button for the second program you want to be able to see. Both taskbar buttons should remain selected. Right-click on the second taskbar button and select Tile Windows Horizontally or Tile Windows Vertically.

Saturday, January 14, 2006

Edit the SendTo Menu

Open:
C:\Documents and Settings\username\SendTo\ (it is hidden)

Copy shortcuts to folders and programs you would like to add to the menu.

Rename the Recycle Bin

If you (like me) would like to be able to rename the Recycle Bin to something else (Trash, Waste, Shredder, etc) then this tweak will make it easy to do so.

Open up your favorite plain text editor (notepad, for example) and copy the following text into a new file:


Windows Registry Editor Version 5.00

[HKEY_CLASSES_ROOT\CLSID\{645FF040-5081-101B-9F08-00AA002F954E}\ShellFolder]
"Attributes"=hex:50,01,00,20
"CallForAttributes"=dword:00000000


Now save this text file as a .reg file, such as "Rename Recycle Bin.reg" and put it wherever you like. Double click on the file, and when it asks you if you want to import it into the registry, choose Yes. You'll notice a new option in the right-click menu to Rename the Recycle Bin. You can also rename it by highlighing the Bin and hitting F2, or by highlighting it and clicking on the file name (just like renaming any other file.

If you want to turn off this new feature, make another .reg file with the same content as above, but change the first number in the "Attributes"=hex: line from 50 to 40 and import that file into the registry.

Turn off clicking tick sound in explorer

Here's how to turn off the annoying sound that plays in windows explorer and internet explorer.

  1. Open the Control Panel
  2. Click on Sounds and Audio Devices
  3. Open the Sounds Tab
  4. Scroll down the list of sounds until you see Windows Explorer
  5. Click on Start Navigation
  6. Change the sound to None

Display a message on Startup

If you would like to display a legal message or any other message in a pop-up window when windows starts read below:

  1. Start regedit, if you are unfamiliar with regedit please see our FAQ.
  2. Navigate to HKEY_LOCAL_MACHINE\SOFTWARE\Microsoft\Windows NT\CurrentVersion\Winlogon
  3. Modify the key legalnoticecaption with what you want to name the window.
  4. Modify the key legalnoticetext with what you want the window to say.
  5. Restart.

Turn off system beeps

  1. Start Regedit. If you are unfamiliar with regedit please refer to our FAQ on how to get started.
  2. Navigate to HKEY_CURRENT_USER\Control Panel\Sound
  3. Once there, locate Beep on the list on the right.
  4. Right click on it and select Modify
  5. Change the value equal to no
  6. Reboot your computer and the beeps will be gone!

Friday, January 13, 2006

Firefox Extensions

Aardvark
AdBlock
ColorZilla
FlashBlock
GooglePreview
No Script
PDF Download
Web Developer (Toolbar)
Yahoo Mail Preview

Paste Special macro in Word

Control formatting of pasted text

When you paste text that you copied from most other applications into Word, the text retains the font size and formatting it had in the original application. To avoid this in Word 2000 and earlier, you had to paste the text by choosing Edit | Paste Special and then selecting Unformatted Text. Word 2002 has a paste pop-up that makes it even easier to paste unformatted text.

You can create a macro to perform this action for you. Start by creating a macro with a name like PasteUnformatted, which records the steps you just performed. You must then edit the macro by hand, because Word's macro recorder does not correctly record your choice of Unformatted Text. In the macro editor, replace the line Selection .PasteAndFormat (wdPasteDefault) with Selection.PasteSpecial DataType:=wdPasteText, Link:=False.

Enabling an Ethernet Network Connection

To enable an Ethernet/LAN connection:

Start > Control Panel > Network Connections > Right click
on Local Area connection > Disable > Right click on it again > Enable


Use this when switching locations (ie: office to home) and the connection should be online
within seconds of re-enabling it.

Tuesday, January 10, 2006

Deleting pages from a PDF in Acrobat

To delete a page in a PDF go to:
Document > Pages > Delete

Deleting Noncontiguous Pages

  1. Open the PDF file

  2. In the Navigation pane, select the Pages tab

  3. Select the first page to be deleted

  4. Press and hold [Ctrl]

  5. Select the other page(s) to be deleted

  6. From the Document menu, select Pages » Delete
    The Delete Pages dialog box appears.
    NOTE: The Selected option will be designated.

  7. Click OK
    The Adobe Acrobat confirmation box appears.

  8. To delete the pages, click OK