How to setup WASTE
First download the setup file here:
WASTE setup Download
Run the setup program that you downloaded.
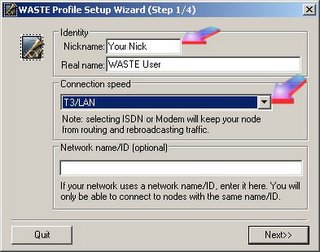
For the first few steps, click next until you get to the following step.
Put in a nickname or screename and put the real name just whatever you'd like.
Select T3/LAN for the connection speed.
Leave the Network name/ID blank.
Click next.
On the following step, click on "Run key generator"
You'll also make a password, which you can save later, but use a password you won't forget.
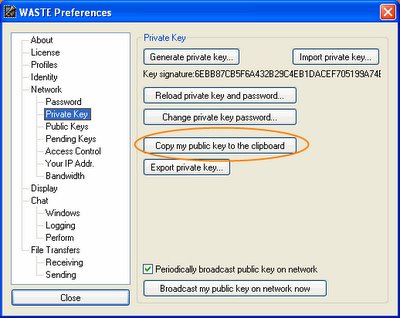
After you've generated your key click on "Copy my public key to the clipboard". Now open up notepad (Start > All Programs > Accessories) or another text editor and paste your key. Save the text file and email/IM it to the person that is connecting you to the network.
The person connecting you to WASTE needs to add your key that you just sent them. That can be done by opening the main WASTE window and going to File > Preferences > Public Keys
1) Click on the add button and import the text file containing the key.
(See image below)
Now click on "Import public keys" and import the text file that either myself or a friend has given you to connect to the network.
For the person already on WASTE to give you their key, they should:
1) Open the main WASTE Window and go to File > Preferences > Private Key
2) Click on copy my public key to the clipboard.
3) either save the key in notepad (Start > Accessories > Notepad) or they can email you the text of the key (it's better NOT to instant message the key because it can get cut off.)
(See image below)
Now the new person connecting to WASTE can either paste in the key or import the text file containing the key.
After you've received the confirmation that the key was imported, click next.
Now to choose the folder for your downloads.
I recommend using the My Music folder on your PC, unless you'd like a different folder for your music/movie/software downloads to go into.
It's up to you whether or not you share your music and other stuff, but if you've got something really rare, or an eclectic collection of music it would be sweet to share. Again, it's up to you.
Now click run.
Ok, we're almost done!!!
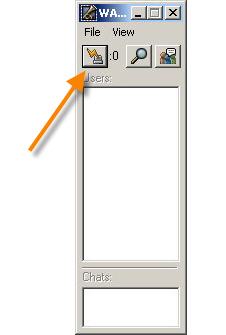
In the little window that comes up, click on the icon with the arrow pointing to it.
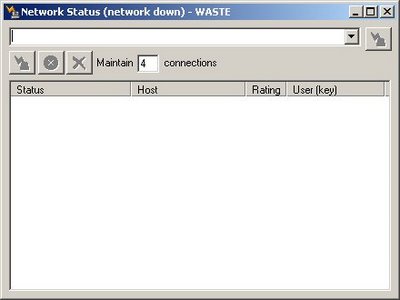
When the following window comes up, change the Maintain "0" connections box to the number 4. Then, type in the IP address of the person connecting you to the network. (If you need to know how to get the IP address read below.)
Once you have the person's IP address type, or paste it, and hit enter.
How to find the person's IP address who is already on WASTE.
1) In the little WASTE window with all of the user names, click on File > Preferences. Then click on Your IP Addr. on the left hand menu. (See the image below.)
Within a few seconds a window should pop-up asking you if you would like to accept a key from a user's name.
Click yes, and keep clicking yes (or use the y key on your keyboard) until it doesn't ask you anymore. You'll probably have to accept about 40-60 keys. Every time you click yes, this is connecting you to a new person.
After that's done, in the same window change the number of connections to 10.
You can close this window now.
Now you should be setup on the network, and there shouldn't be anymore setup required each time you want to connect.
There are two settings you should adjust before using WASTE.
Click on File > Preferences.
Click on "Receving" and make sure the box is checked to "Prompt before accepting"
Now click on "Pending Keys" and check the box for "Auto-accept broadcasted public keys"
This will prevent the key prompts from coming up while you are doing other work. On several occassions, I was playing a multiplayer first person shooter and the key box pop-up in front of my screen, pausing the game. It will also prevent you from being annoyed by having to accept new ones while you're working on other stuff.
NOW YOU'RE READY TO EXPERIENCE THE GLORY OF WASTE.
To search for files, click on the magnifying glass icon in the main window.
Wednesday, January 25, 2006
Setting up Private Network (Waste)
Subscribe to:
Post Comments (Atom)
2 comments:
good work bayard... you are a god among men.
incredible.
Post a Comment